Find your direction with this do-it-yourself compass.
There is one tool that is sure to give you guidance if you get lost, a compass. But what could you do if you forgot to pack this useful tool in your survival kit? Easy! Float a needle on top of a standing pool of water. Well, there’s a bit more to creating a compass out of a needle and some water, but you can do it right at home with just a few tools.
여러분이 직접 만든 나침반을 가지고 방향을 찾아보세요.
여러분이 길을 잃었을때 도움을 줄 수 있는 하나의 도구가 있는데 그것이 바로 나침반이에요. 그런데 만약 이 나침반을 조난(생존)가방에 잘 챙겨 넣는것을 잊어버렸다면 어떻게 하실래요? 아주 쉬워요. 움직임이 없는 물위에 바늘을 띄어 보세요. 물론 물과 바늘보다 더 필요한 것이 있지만 몇가지 간단한 도구로 집에서 나침반을 만들 수 있어요.
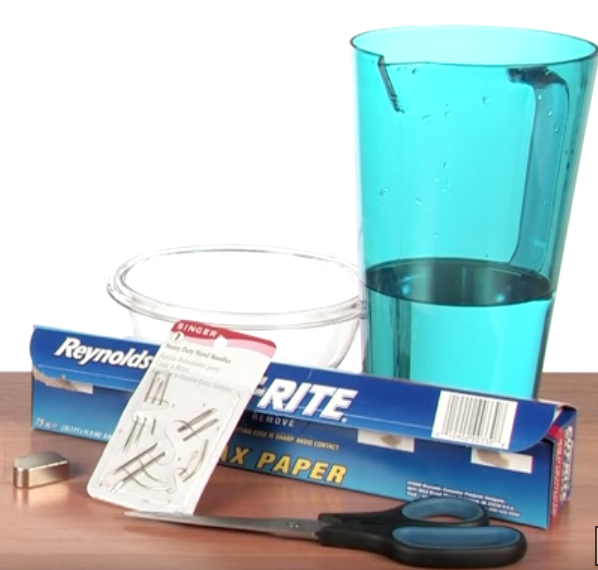
■ Things you need (필요한 것들)
•Sewing needle 바늘
•Magnet (make sure it has a "north"/"south" distinction") 남극과 북극이 잘 표시되어 있는 자석
•Wax paper 기름종이
•Scissors 가위
•Red Sharpie marker 빨간 유성펜
•Bowl 그릇
•Water 물
■ Procedures (실험절차)
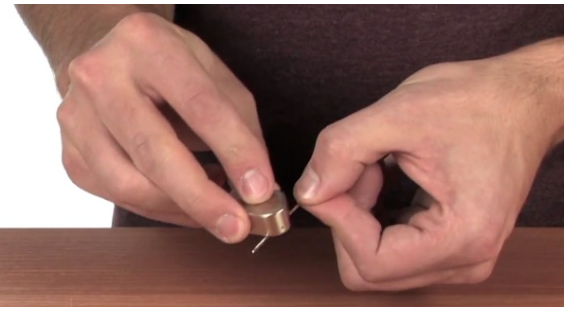
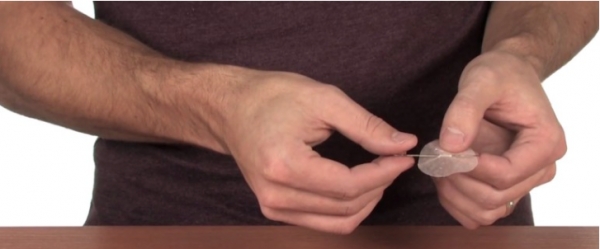
1.Begin by magnetizing your sewing needle – rub one end of the needle with the “north” pole of your magnet 50 times. Using a red Sharpie to color this end of the needle. 우선 바늘을 자석화하는 것으로 실험을 시작해요. 바늘 한쪽 끝을 자석의 북극에 대고 약 50번 정도 문질러 주세요. 빨간 유성펜으로 자석화된 바늘 이 쪽을 칠해주세요.
2.Repeat step one, rubbing the “south” pole of your magnet against the opposite (not-yet magnetized) end of the sewing needle. 이제는 똑같은 방식으로 바늘의 반대쪽을 자석의 남극쪽에 50번 문질러주세요.
3.Using a pair of scissors, cut a circle about 1″ (2.5 cm) in diameter out of the wax paper. 가위를 이용해 기름종이를 지름 약 2.5cm 정도의 원형으로 잘라주세요.
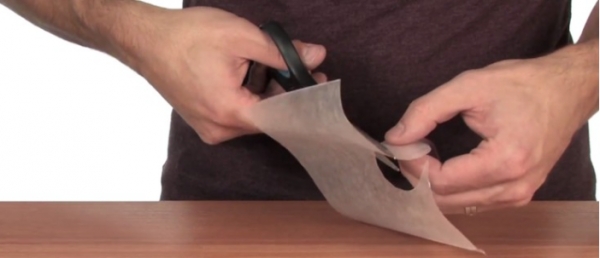
4.Carefully thread the needle through the wax paper circle, as you would a needle into cloth. Don’t run the needle all the way through, but leave the needle half-way through the wax paper with the needle lying flat on the surface of the wax paper. 바늘로 천에 바느질을 하듯이 기름종이를 바늘로 떠 주세요. 기름종이를 완전히 바느질 하는것이 아니라 바늘을 기름종이 반정도 통과되서 걸치게 해서 바늘이 기름종이 위에 평평하게 누워있을 수 있도록 해주세요.
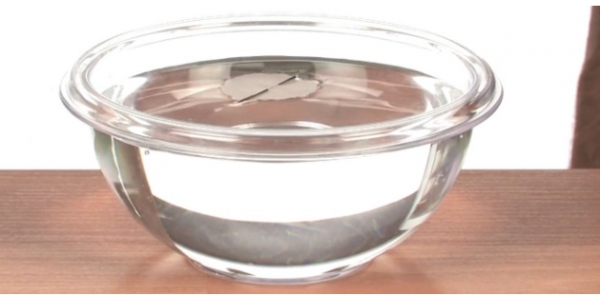
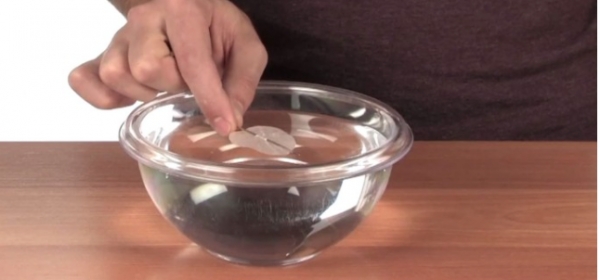
5.Float the wax paper on the surface of the water so that the ends of the needle are on top of the wax paper. 기름종이를 물위에 띄어주세요. 그래서 바늘이 기름종이 위에 올라가있는 모양이 될 수 있도록 말이에요.
6.While the needle and paper float on the surface of the water, watch what happens. The needle will rotate on the surface of the water. The red end of the needle, the end you magnetized with the “north” pole of the magnet, will point north! 바늘이 있는 기름종이가 수면에서 떠다니고 있는 것을 잘 관찰해 보세요. 아마 바늘이 원형을 그리며 회전할 거예요. 빨간 유성펜으로 칠한쪽, 즉 북극 자석으로 자석화 시킨 바늘이 바로 북쪽을 가르킬 거예요!
■ Scientific Explanation (과학적 설명)
Now that’s cool. You’ve made a simple compass! The key to making your compass work is rubbing the magnetic poles of your magnet on opposite ends of the needle. When you rub the needle with your magnet, you leave residual (left-behind) magnetic material. This residual material magnetizes the needle itself.
For the compass to work, you also need to remove as much friction as possible from your needles and wax paper apparatus. By floating this device on the water’s surface, you removed a lot of friction (as opposed to setting it on a countertop or table). Once floating on the water, the Earth’s magnetic field (caused by the magnetic materials nickel and iron in the Earth’s core) pull at the opposite poles of the needle.
자 신기하죠? 여러분이 바로 간단한 나침반을 만든거예요. 나침반 만드는 과정중 가장 중요한 것은 바늘 양끝을 자석의 양끝에 잘 문질러 주는 것이예요. 바늘을 자석으로 문질러 주었을때 자석화된 물질을 조금 남기게 되는 것이고 그 남겨진 물질이 바늘을 자석화 시키는 것이예요.
나침반이 잘 작동하려면 바늘과 기름종이간의 마찰을 가능한 많이 제거해 주는 거예요. 이 바늘과 기름종이를 수면에 띄움으로해서(테이블이나 다른 표면에 놓는것보다) 발생할 수 있는 마찰을 많이 제거하게 되는 것이지요. 바늘이 수면에 뜨게되면 지구중심의 니켈이나 철과 같은 자석물질로 생겨나게된 지구의 자기장에 의해 바늘의 양쪽을 잡아당기게 되는 것이지요.
■ Key Vocabulary
•Compass 나침반
•Survival 생존
•Wax paper 기름종이
•Rub 문지르다
•Surface 표면
•Rotate 회전하다
•Friction 마찰
•Device 기구, 장비
•Remove 제거하다, 없애다
•Residual 잔여물
•Opposite 반대
■ To watch the experiment video, please go to : 과학실험 비디오
http://blog.naver.com/handsonenglish (사진 및 내용 출처: https://www.stevespanglerscience.com)
<김광미(Kwangmi Kim Shin)/TCIS(대전국제학교) ELL Coordinator/미국 존스홉킨스 교육대학원 석사/미국 매릴랜드주 몽고메리카운티 공립학교 ESOL교사>