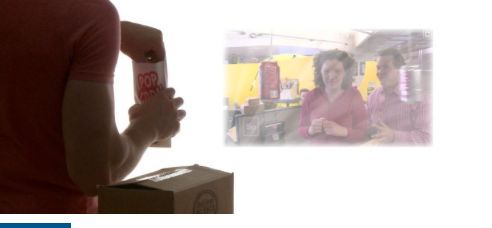
With a cardboard box and a few simple steps, you can make a projector for the movies in your phone.
종이상자로 몇가지 스텝만 따라하면 여러분 휴대폰의 영화를 볼수 있는 프로젝터를 만들 수 있어요.
If you’ve watched videos on a smartphone, then you know it can be tough to really enjoy the show on such a small screen. For those who are strapped for cash and/or in the mood to do something creative, make your own projector. All you need is a cardboard box, a smart phone with videos, and a few basic tools. You end up with a real, working projector that you’ve made with your own hands. Spend your money on something else!
여러분이 휴대폰을 통해 비디오를 본적이 있다면 정말 작은 스크린으로 영상을 즐기는것이 어렵다는 것을 알거예요. 돈이 조금 부족하거나 아니면 좀 창의적인 어떤것을 해보고 싶은 생각이 든다면 여러분만의 프로젝터를 만들어보세요. 필요한 거라고는 종이상자, 영상이 나오는 휴대폰 그리고 몇가지 간단한 도구예요. 여러분 손으로 직접 잘 작동하는 프로젝터를 만들 수 있어요. 돈은 다른 곳에 쓰도록 하구요!
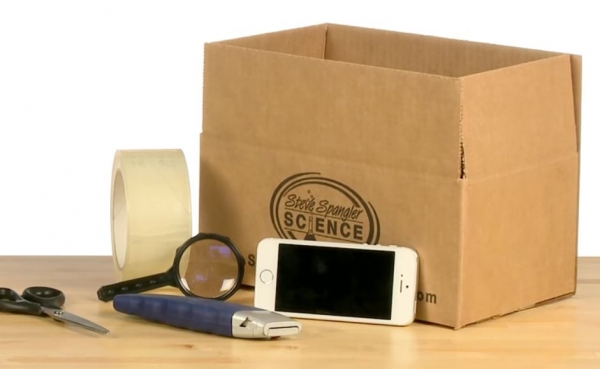
■ Things you need (필요한 것들)
Cardboard box (small, rectangular) 직사각형 모양의 작은 종이상자 / Smartphone with videos 비디오가 나오는 휴대폰 / Tape 테이프 / 2” (5 cm) Magnifying glass 5cm 반경의 돋보기 / Utility knife 칼 / Scissors 가위 / Pen or marker 볼펜 또는 싸인펜 / Adult supervision 어른들의 지도
■ Procedures (실험절차)
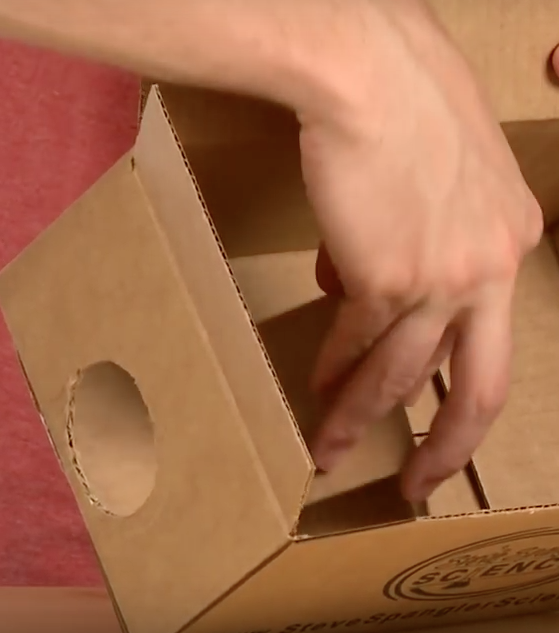
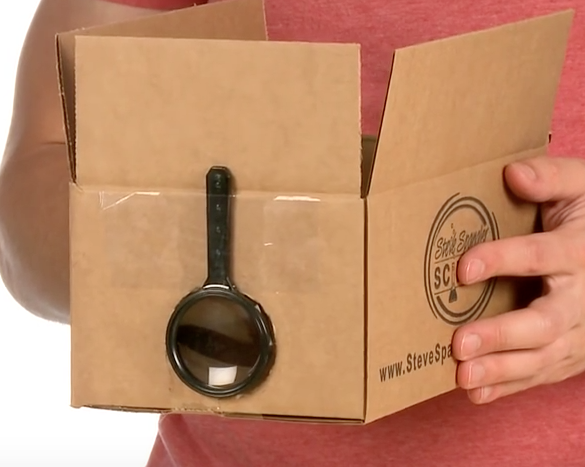
1. Hold the magnifying glass against one of the “short” sides of the rectangular box. Position it in the center of the side but near the bottom edge. Trace around the lens of the magnifying glass with a pen or marker. 돋보기를 상자 옆면의 작은 직사각형 쪽에 놓고 들어주세요. 그 면의 가운데 그렇지만 아래면쪽으로 더 가깝게 놓아주세요. 볼펜이나 사인펜으로 돋보기 렌즈 바깥부분을 따라서 그려주세요.
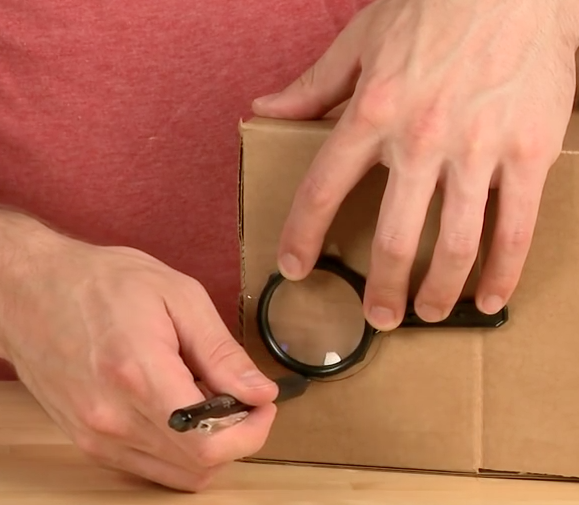
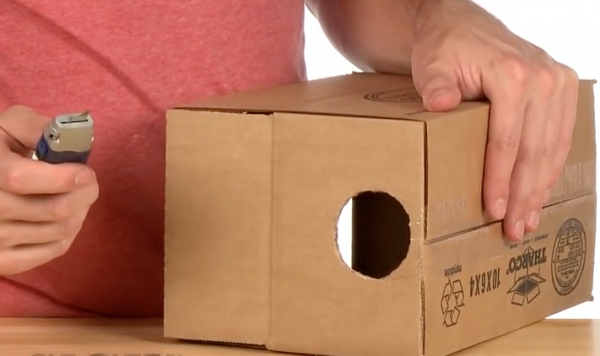
2. With the utility knife or sharp scissors, cut out the circle you just drew. Keep the edge of the cut as round and smooth as you can. 카터칼이나 가위를 가지고 방금 그린 돋보기 모양을 잘라주세요. 잘라진 면이 부드러운 원형이 되도록 해주세요.
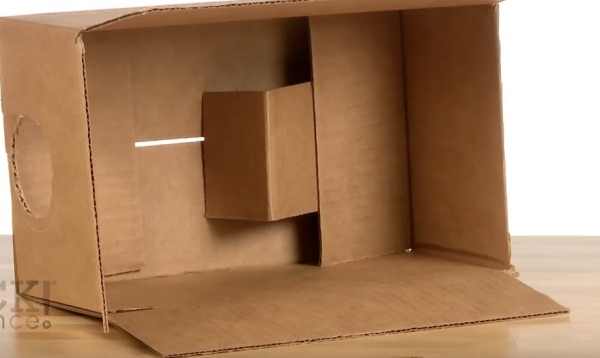
3. The phone needs something to lean against inside the box. Cut off the short flap on the top of the box that’s opposite the hole you just made. 핸드폰을 상자안에 잘 세워놓을 수 있는 것이 필요해요. 지금 돋보기모양의 구멍을 만든 반대편의 상자 뚜겅 부분을 잘라주세요.
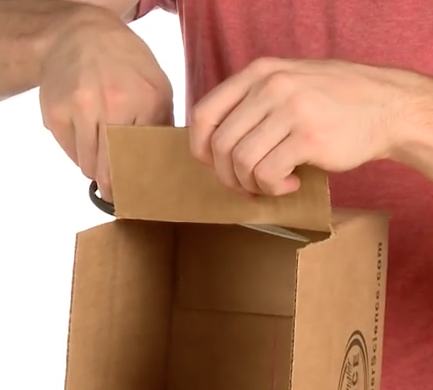
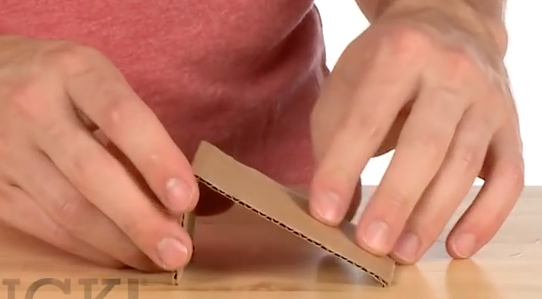
4. Fold about a third of the flap downward so it looks like a ramp. 잘라진 상자 종이의 1/3 정도 되는곳을 접어서 비스듬한 도로 처럼 만들어주세요.
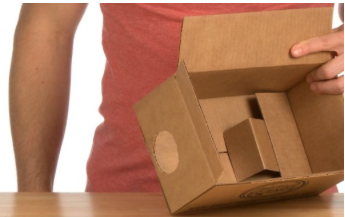
5. Slide the ramp portion under the short flap on the bottom of the box opposite the hole you cut. It should be a snug fit and the bottom flap should hold the ramp in place. Some tape might be helpful. The vertical piece of the ramp should be directly opposite the hole you cut in about the middle of the box. It helps if it’s as straight up and down as you can get. This is the location for the phone. 여러분이 구멍을 만든 부분의 반대편에 이 비스듬하게 접은 종이를 밀어넣어주세요. 아마 잘 맞게 들어갈거에요. 상자 아래의 뚜겅이 이 비스듬한 상자 종이를 잘 잡아줄 거예요. 테이프로 고정 시켜 주시는 것도 도움이 되요. 이 비스듬한 종이는 여러분이 자른 구멍과 반대편에 있어야 해요. 되도록이면 반듯하게 아래쪽에 있을 수 있도록 해주세요. 이곳이 바로 핸드폰을 놓을 곳이예요.
6. Securely tape the magnifying glass to the outside of the box over the hole you cut. That’s it! 이제 돋보기를 여러분이 낸 구멍 바깥쪽으로 놓고 테이프로 잘 붙여주세요.
7. Now for some technical stuff: lock the screen on your phone to a landscape orientation. 이제 좀 기계적인 부분이예요. 우선 여러분의 핸드폰의 화면이 가로방향으로 고정시켜 움직이지 않게 해주세요.
8. Start playing a long video on the phone. Place it into the projector box so the images are upside down and lean it against the prop you installed. Close the box as tightly as you can with tape or lay a heavy book on top to make it as dark as possible inside the box. 핸드폰으로 좀 긴 영상을 재생해 보세요. 이제 핸드폰을 거꾸로 해서 프로젝터 박스안에 넣으시고 핸드폰이 비스듬한 종이에 잘 기대어 서있을 수 있도록 해주세요. 이제 상자를 테이프를 이용하거나 두꺼운 책을 놓아서 상자 안으로 빛이 들어가지 않도록 상자를 잘 밀폐해주세요.
9. Aim the box at your screen (a white wall), darken the room, grab a snack, and enjoy the show! 이제 상자를 여러분의 화면 (흰벽)에 잘 고정시켜주시고, 방을 어둡게하고, 간식거리를 준비한 후 이제 영상을 즐겨보세요!

■ Scientific Explanation (과학적 설명)
Your phone is upside down when you put it into the box and the magnifying glass is a lot smaller than the image on the screen. It just seems a little weird, right? Think about the upside down phone. You probably know that, inside their eyes, humans “see” images of the world upside down. Well, they would be without corrections made by your brain. The Homemade Projector can help visualize this concept. The human eye has a lens in it similar to the magnifying glass that’s attached to your projector. The lens on the box flips images right side up as they pass through it going from the upside down phone to the screen. Your eye flips images coming from what you see so they’re upside down. While your brain flips the image to its correct orientation, the wall doesn’t. That’s why you have to set your phone in the box upside-down.
상자에 넣은 여러분의 핸드폰은 거꾸로되어 있고 돋보기는 벽에 보여지는 스크린보다 훨씬 작아요. 좀 이상하지요? 거꾸로 되어 있는 핸드폰을 생각해 보세요. 여러분들도 아마 아실 거예요. 사람의 눈은 이세상의 이미지를 거꾸로 인식하고 있다는 것을요. 우리 뇌에서 제대로 잡아주시 않으면 거꾸로 보게되는 거예요. 집에서 만든 프로젝터가 이러한 개념을 잘 이해하도록 도와줄 거예요. 사람의 눈에는 여러분들의 프로젝터에 돋보기가 있는 것과 같이 렌즈가 있어요. 거꾸로 나오는 전화기의 영상이 이 렌즈를 통과하게 되면 제대로 화면이 잡히게 되요. 여러분의 눈이 이미지를 바로 잡아서 여러분이 보게 되는 것이 거꾸로 보이게 되는 것이지요. 여러분의 뇌는 이미지를 제대로 잡아주는데 벽을 그렇지 못해요. 그래서 전화기를 상자안에 거꾸로 놓는 것예요.
But, how about that image on the screen? It’s way bigger than the lens in the magnifying glass! This works because of the shape of the lens and the fact that light travels in straight lines. A convex lens has a shape where the middle is thicker than the edges, rather than a concave lens which is thinner in the middle than at the edges. The shape of a convex lens allows it to catch, bend, and focus more light coming from the phone inside the box.
그렇다면 벽에 비쳐지는 스크린는 어떤가요? 돋보기 렌즈보다도 훨씬 크게 나오잖아요. 이것은 렌즈의 모양과, 빛이 직선으로만 움직이는 성질 때문에 그래요. 볼록렌즈는 렌즈의 가운데 부분이 가장자리보다 두껍고 오목렌즈는 가운데 부분이 가장 자리보다 얇아요. 볼록 렌즈는 상자안의 전화기에서 나오는 빛을 잡고, 구부리고 더 선명하게 할 수 있어요.
Once you have a dark enough space by darkening the “theater,” the magnifying glass will gather, focus, and project the light coming from the phone to the screen and you see images. Thanks to your Homemade Projector!
여러분의 영화관 같은 방을 충분히 어둡게 해주게 되면 돋보기가 전화기에서 나오는 빛을 모아서, 초점을 잘 맞추어 상영하게 되요. 바로 집에서 만든 영사기 덕분이죠!
■ Key Vocabulary
Projector / Smartphone / Cardboard 두꺼운 종이, 판지 / Strapped 묶여있다 (strapped for cash 돈에 여유가 없다) / Magnifying glass 돋보기, 확대경 / Trace 따라 그리다 / Edge 가장자리 / Opposite 반대편의, 반대 / Ramp 비스듬한 도로, 경사진 도로 (비탈길, 경사로) / Landscape orientation 가로방향 / Visualize 시각화 하다 / Convex lens 볼록렌즈 / Concave lens 오목렌즈
■ To watch the experiment video, please go to : 과학실험 비디오
http://blog.naver.com/handsonenglish (사진 및 내용 출처: https://www.stevespanglerscience.com)
<김광미(Kwangmi Kim Shin)/TCIS(대전국제학교) ELL Coordinator/미국 존스홉킨스 교육대학원 석사/미국 매릴랜드주 몽고메리카운티 공립학교 ESOL교사>